XO Legacy APIs
This section aims to cover the legacy APIs of XO that are used to capture the shoppers behaviours as well as sending to XO an item catalog
Identify visitors
Identifying visitors is a complex process. Visitors can be anonymous, nominatives users or authenticated users (logged in on the website). Several visitors can share the same device. Early Birds is a cross-device platform so it’s required to merge profiles between CRM, internet accounts, mobile users, and emails.
The Early Birds API allows you to manage all those scenarios in a very simplified way. You just have to send the information you have on a specific user at a T time, and all the merge mechanisms will be fired automatically by Early Birds to find the best matching based on that information.
This documentation exposes three different examples:
A basic identification (a new visitor is coming to your website and you don’t know him at all)
An anonymous identification (a visitor is coming back to the website. You don’t know who he is, but you know what he did before)
A nominative identification (a visitor is logged in on your website, so he is known in your user referential)
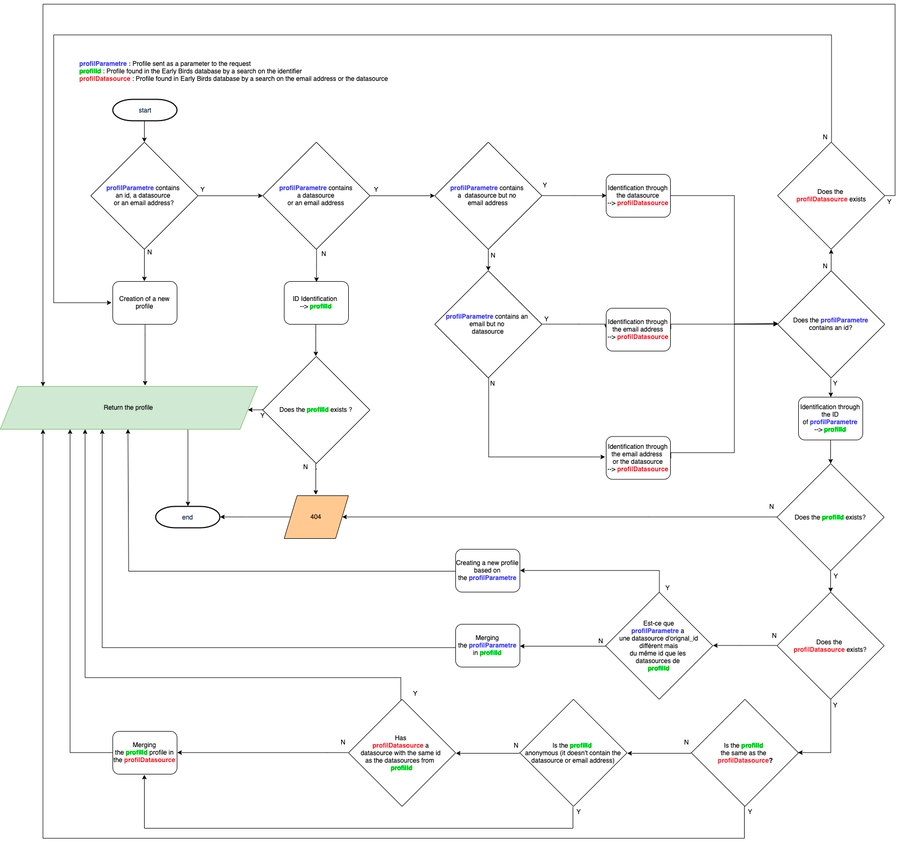
Even though it’s usually not necessary to understand what’s happening behind the scene and to understand all complex mechanisms handled by Early Birds to merge a profile, sometimes it can be useful to know how it works and in which order every step occurred. The following graph explains each step and will help you to have a good understanding of the identification process.
Click on the image to zoom in
First identification
To identify an unknown visitor (first identification), use the code below
Each time a visitor comes to your website or your mobile app, it’s necessary to identify him to retrieve his unique Early Birds ID. This ID must be saved somewhere (local storage, cookie…) so you can retrieve his profile for each new connection.
If the user is unknown (he never came on the website), the identification process will automatically create a new user and generate an ID for him.
If you are using Early Birds API, it’s important to save this ID for a later identification (for example in a cookie). If you are using Javascript tags, the ID will be automatically saved by the Javascript SDK.
You have to replace: -
{{trackerKey}}with your trackerKey
Known anonymous visitor
This section is only for API users. If you are using our SDK or Javascript tags, this is automatically handled and you can use the anonymous identification (see above).
To identify a known anonymous visitor, use the code below:
You have to replace: -
{{trackerKey}}with your trackerKey -{{profileId}}with the visitor’s Early Birds ID
If a user has already been identified, he has an Early Birds ID. To identify him a second time, you have to send his Early Birds ID in the body of the API call.
Nominative visitor identification
In order to identify a nominative visitor, use the following code:
You have to replace: -
{{trackerKey}}with your trackerKey -{{profileId}}with the visitor’s profileId -{{datasourceId}}with your datasource ID (ID of your own visitor referential) -{{originalId}}with the visitor ID in your own referential
A nominative visitor is a visitor with an ID in your own referential (for example: an account on your website or in your CRM)
Early Birds allows the matching between your (or yours) customer referential(s) with the Early Birds profile referential.
For each customer referential (internet account, CRM, …), a datasource must be created in the Early Birds platform. Each datasource have its own unique ID, the datasourceId.
When you Early Birds account is created, a first referential is automatically created and its ID (datasourceId) is sent to you.
In order to merge your referential with the Early Birds profile, you just need to add the couple datasouceId/originalId in the API call body.
The originalId is the customer ID in your own referential (internet account, CRM…)
Note: When called directly through the API, the profileId is mandatory, except if the visitor is unknown. If the visitor is unknown, a new profile will be automatically created and a profileId will be returned. If you are using javascript tags, all this behavior is automatically managed by our SDK.
Summary
In the previous chapters, we’ve seen the 3 main identifications modes. However, those 3 modes are usually coded in only one javascript tag or API call, and it can be summed up like this:
API only: If I know the profileId, then I send it in the body of the API call.
API or tags: If I know the visitor (internal id, internet account, CRM account…), then I send a couple datasourceId/userId in the body of the API call.
User segments and attributes
You have to replace: -
{{trackerKey}}with your trackerKey -{{profileId}}with the visitor’s profileId -{{datasourceId}}with your datasource ID (ID of your own visitor referential) -{{originalId}}with the visitor ID in your own referential
Each time you identify a user, you can send attributes or segments to Early Birds.
A segment is a value picked in a list of possibilities. For example, you can have a segment defining if the user is logged or not; if he is returning; if he is a member of the loyalty program; if he is a man or a woman…
An attribute (info) is a value that is not finite. For example, the town of the visitor, his age, his last visit timestamp…
Segments can be used to group visitors together or to target them with an email. For example, if you want to target all returning users, you can use this segment. Attributes will only be used in realtime during the visit, for example, to identify the nearest store for this particular visitor.
Activity tracking
General information
An activity is a visitor behavior. Each behavior can be tracked to enrich algorithms.
Each activity type is described by a verb: view, buy, add-to-cart…
You are free to create new verbs. For example: add-to-wishlist, ask-for-details, comment… For each verb, you can define a weight in the Early Birds console. For example, if a buy is more important than a view, you can add a weight of 50 to the buy, and a weight of 1 to the view.
Some verbs are mandatory, they are used to compute the main KPIs.
| Verb | Definition |
|---|---|
view | Item view (product view, content view…) |
add-to-cart | Item added to cart |
buy | Item bought |
like | “I like” click on an item |
dislike | “I dislike” click on an item |
click-on-reco | Click on a recommendation |
You can add some verbs if you want and collect specific activities that will enrich algorithms.
To send an activity to Early Birds, use the code below.
You have to replace: -
{{trackerKey}}with your trackerKey -{{profileId}}with the visitor’s profileId -{{itemId}}with the item Id (product, page…) -{{verb}}with the verb describing the activity (view, buy, add-to-cart…) -{{type}}with the item type (product, content, look…) The profile parameter doesn’t need to be sent if you are using javascript tags. It’s handled by the SDK.
An activity is defined with the following parameters:
| Parameter | Definition |
|---|---|
verb | Describe the kind of behavior (view, buy, add-to-cart, click…) |
type | Describe the object type (product, page, look, category…) |
original_id | Object ID (product id, category id…) |
price | Optional : Product price when the activity occured (in cents) |
quantity | Optional : Number of products concerned by the activity |
widgetId | Optional : For activities that occured on a recommendation widget (click-on-reco, like, dislike…), a widgetId can be sent in order to compute some analytics |
API return sample:
The API will return an activities array, containing one activity with the following attributes:
| Attribute | Definition |
|---|---|
id | Activity ID |
verb | Describe the kind of behavior (view, buy, add-to-cart, click…) |
type | Describe the object type (product, page, look, category…) |
original_id | Object ID (product id, category id…) |
profileId | Visitor ID |
datasourceId | Datasource ID |
segments | Segments list that can be used to filter activities |
tenant | Your Early Birds account ID |
price | Product price when the activity occured (in cents) |
quantity | Number of products concerned by the activity |
timestamp | Activity creation date |
Tracking sample
Product view tracking
You have to replace: -
{{trackerKey}}with your trackerKey -{{profileId}}with the visitor’s profileId (only for API calls) -{{itemId}}with the object Id (product Id…)
Tracking a product view requires the “view” verb and the product ID as “original_id”.
Add to cart tracking
You have to replace: -
{{trackerKey}}with your trackerKey -{{profileId}}with the visitor’s profileId (only for API calls) -{{itemId}}with the object Id (product Id…) -{{price}}with the product price in cents
Tracking an add to cart requires the “add-to-cart” verb and the product ID as “original_id”.
Buy tracking
You have to replace: -
{{trackerKey}}with your trackerKey -{{profileId}}with the visitor’s profileId (only for API calls) -{{itemId}}with the object Id (product Id…) -{{price}}with the product price in cents
Tracking a buy require the “buy” verb and the product ID as “original_id”.
Click on a recommendation widget tracking
You have to replace: -
{{trackerKey}}with your trackerKey -{{profileId}}with the visitor profileId (only for API calls) -{{itemId}}with the object Id (product Id…) -{{widgetId}}widget ID -{{recommendationId}}ID of the recommendation
Tracking a click on a recommendation widget require the “click-on-reco” verb, the product ID as “original_id”, the widget ID and the recommendation ID. The recommendation ID is return by the API when you ask for a recommendation. It’s needed to link the recommendation and the click activity.
When you are using Javascript Tags, you don’t need to implement the click-on-reco tracking. If you used a tag to display the widget, the tracking will be automatically fired with the good parameters.
Querying activities
Sometimes, you need to query some activities for a specific profile
You have to replace: -
{{trackerKey}}with your trackerKey -{{profileId}}with the visitor’s profileId (only for API calls) -{{type}}with the activity type (product, page…) -{{verb}}with the verb (view, buy, add-to-cart, click…)
The API will reply with an array “data” with all profile activities.
You can filter those activities by type or by verb using the parameter “filter”. This parameter respects the JsonAPI norm: http://jsonapi.org/format/#fetching-filtering
Results can be paginated.
| Parameter | Definition |
|---|---|
page[number] | Page number to display |
page[size] | Number of activities per page |
filter[type] | Used to filter by item type (product, page, look, category…) |
filter[verb] | Used to filter by activity verb (buy, like, add-to-cart…) |
Items API
You must be authenticated to use this endpoint
The Item API is used to keep your item catalog up-to-date within Early Birds platform. For example, you will be able to update in realtime your items (stock, price or every other attributes) or to delete unavailable items
We use a specific id format inside the platform which best describes the context and kind of the item:
| Attribute | description | default value |
|---|---|---|
version | Optional: Item catalog can have multiple versions. Use this parameter to create next version of your catalog | 0 |
context | Optional: This value is used to describe in which context the item has its values. For example, it can represent various stores. You should declare the available contexts beforehand (c.f below) | default |
kind | Optional: This value is used to identify the kind of an item (product, content, ..). | product |
id | Mandatory: Your actual product ID | no default value |
If you only use one context and one kind, you can just send your product id in the id field.
If you want to use a more advanced format, you can send the id as a string or as an object.
EXAMPLE OF STRING ID
You have to replace: -
{{action}}by the wanted action on the item -{{version}}by the item version -{{context}}by the item context -{{kind}}by the item kind -{{id}}by the item id -{{data}}by the product datas as a json object (see example above)
The string format can be created with different way. The table bellow list all those ways:
| ID | Example |
|---|---|
TENANT#VERSION#CONTEXT#KIND#ID | 5524e231191874e63bd75a8b#0#default#product#9999 |
VERSION#CONTEXT#KIND#ID | VERSION#CONTEXT#KIND#ID |
CONTEXT#KIND#ID | default#product#9999 |
KIND#ID | product#9999 |
ID | 9999 |
EXAMPLE OF OBJECT ID
You have to replace: -
{{action}}by the wanted action on the item -{{version}}by the item version -{{context}}by the item context -{{kind}}by the item kind -{{id}}by the item id -{{data}}by the product datas as a json object (see example above)
Instead of sending the id as a string, you can also send it as a json object (see example on the right)
EXAMPLE OF A CALL WITH DATA
You have to replace: -
{{action}}by the wanted action on the item -{{id}}by the item id (Refer to the possible formats) -{{itemTitle}}by the title of your item -{{itemImage}}by the image of your item -{{itemUrl}}by the url of the image -{{itemPrice}}by the price of the item in cents -{{recommendedFlag}}by true or false depending if you want your item to be recommanded or not -{{customAttributes}}will contain the item’s custom attributes. It must be a valid JSON collection
Available actions:
| Action | Description |
|---|---|
create | Use this action to add a new item to your catalog |
replace | You may use this action to completely replace the content of an item. |
patch | This action must used when you need to update a specific value of an item |
delete | You may use this action to delete a specific item |
This endpoint must be called using POST methods having a payload containing an array of actions to be performed. The maximum number of actions allowed is set to 500 actions.
An action must respect the following JSON format:
| Attribute | Definition |
|---|---|
action | Desired action (create, replace, patch or delete) |
id | Item id. Must respect the previously described format |
data | must be a valid JSON collection (format is described below) |
data format:
| Attribute | Definition |
|---|---|
title | Item’s title |
image | Item’s image url |
url | Item’s url on the website |
tags | Optional: must be an array of tags. This will add manual tag to the item |
booster | Boost or not the item. Must be a signed integer |
price | Item’s price |
recommended | Wether you want to recommend the product or not (true or false) |
attributes | JSON collection of the item’s custom attributes |
l10n | JSON collection of wanted translation. Each desired language must respect the ISO 639-1 format |
Every attributes can be optional depending of the action. If you’re making a replace, you must provide all the item’s attributes (attributes that are not in the payload of a replace action will be dropped from the item), if you’re making a patch, you can specify only the attributes that you want to update.
The delete action only needs the item id.
Item Contexts API
You must be authenticated to use this API
Contexts used in item IDs must be declared before importing the items, either from the user interface or using the REST API described here.
The OpenAPI definition for this API is available here.
You can find the tenant ID(s) required by the endpoints in the integration page of the user interface under Tenant information.
Get all contexts
You have to replace: -
{{tenantId}}by your tenant ID -{{token}}by the OpenID authentication token
Get a context By ID
You have to replace: -
{{itemContextId}}by the context ID -{{token}}by the OpenID authentication token
Get a context By name
You have to replace: -
{{tenantId}}by your tenant ID -{{contextName}}by the context name -{{token}}by the OpenID authentication token
Create a context
You have to replace: -
{{token}}by the OpenID authentication token -{{contextName}}by the context name -{{tenantId}}by your tenant ID
Update a context
You have to replace: -
{{token}}by the OpenID authentication token -{{contextId}}by the context ID -{{contextName}}by the updated context name
Delete a context
You have to replace: -
{{itemContextId}}by the context ID -{{token}}by the OpenID authentication token
Private Legacy APIs authentication
This section describes how to authenticate calls to Early Birds private API using a standard OAuth 2 client credential flow.
Generate a Public and Private Key Pair
Replace
your-companyby the name of your company.You will be asked to enter a passphrase that will be used to encrypt private key.
The encrypted private key will be generated in
key.pemand the public key certificate incertificate.pemIt is sometimes useful to also have them in PKCS12 format:
You will need an RSA private key to sign your access token request, and a corresponding public key certificate that Early Birds authorization server will use to verify the signature.
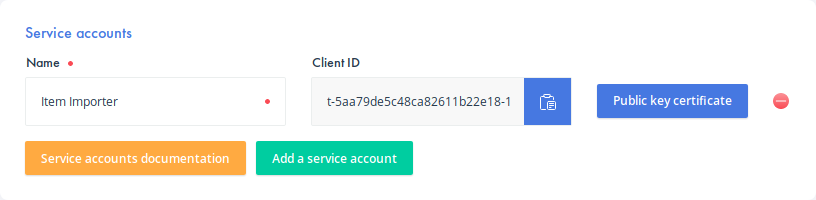
Create a Service Account
In Early Birds console:
Go to the
Developers > Integrationmenu.Click the
Add a service accountbuttonEnter a relevant name for your service account, e.g.
Item ImporterClick the
Public key certificateon the right of the new service accountIn the side panel that appeared, click the
Import CertificatebuttonSelect the
certificate.pemfile that you generated in the previous stepClick
Closeto close the side panelClick the
Savebutton on the bottom right of the page
A Client ID has been generated for your service account, make a good note of it as you will need it later.
Get Access Tokens
You have to replace: -
{{clientID}}with the client ID from the previous step -{{jwt}}with the JWT signed by your private key Authorization server response sample:
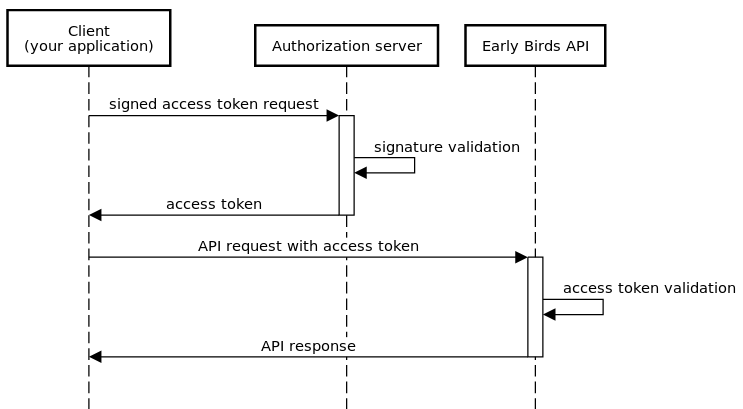
To query Early Birds’ private API, you will need to provide an access token in the Authorization header of your HTTP request. This token can be retrieved from Early Birds’ authorization server using OAuth 2 JWT client authentication as described in RFC 7523.
The token endpoint to use is https://iam.early-birds.io/auth/realms/master/protocol/openid-connect/token.
The basic steps are:
Build a JWT with the following claims:
iss: your client ID (c.f. previous step)sub: also your client IDaud: Early Birds’ authorization server token endpointjti: a uniquely generated IDexp: a rather short expiration time, one minute is more than enough
Sign the JWT with the private key you generated earlier
Send a
client_credentialsgrant request to Early Birds’ authorization server token endpointUse the
access_tokenin the response to authenticate your requests to Early Birds’ private API.
You can use the token as many times as you want before its expiration. The expiration delay is given in the expires_in field of the returned json (typically 5 minutes
You should reuse access tokens as much as possible because sigining JWTs and calling the token endpoint can be time and resource consuming
Node.js example
Java example
Add the following dependency:
Last updated